The ultimate guide to creating and sharing a walking route on Go Jauntly
Haven’t created a walk on Go Jauntly yet? Here's the ultimate guide:
We will dive in deeper below, but if you only have 5 seconds, this is the summary of creating and sharing a walk in the app:
1. Make sure you have location switched on for your pictures.
2. Take pictures as you walk (key points of interest, that sort of thing)
3. Either during or after the walk (we personally prefer after) open the app and tap the + icon on the navigation bar.
4. Choose images you want to use in order of the steps, reorder images as you wish and check that the pin locations are correct. You can adjust the location using the pin icon.
5. Add interesting text info to your steps that others may find interesting.
6. Pop in an interesting route title, description of the walk and select the best cover image that describes your walk and makes people want to go on it.
7. Preview your walk, make sure you're happy and then publish it. You can always edit or delete it later.
Read on for more detailed instructions…

1. Take pictures as you walk
Take plenty of pictures on your fave route. Sometimes you’ll find yourself on a walk you weren't even planning, just start snapping away with location switched on. If you’ve images from a while ago, stick them in an album on your phone and then create your route from there - it is super easy.

2. Select your steps
Now you’ve got your walking route in photo form. Open the app, tap the + icon on the navigation bar. Your camera roll appears and then add all the images you want as steps in order, starting with the first step in your walks as the first picture. You can always reorder the steps later.
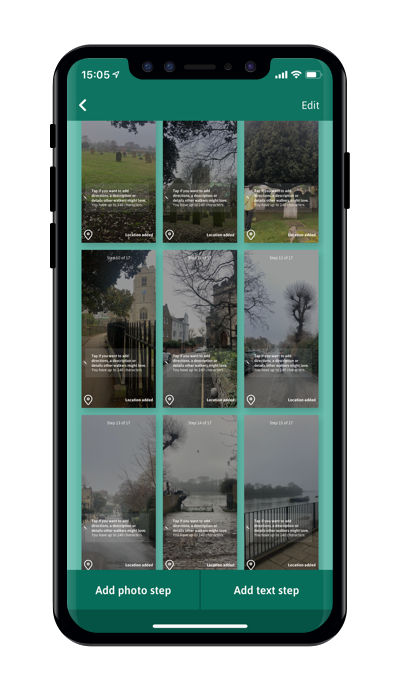
3. Get an overview
If you want to see an overview of the steps you've added, or reorder them. To access the thumbnail view, pinch inwards on iOS or tap the four square icon on the top of your screen on Android. Hold down to delete, or drag to reorder the steps. You can also delete by swiping up on any step in maxi view. You can amend the location of a step by tapping edit on the pin to move it.
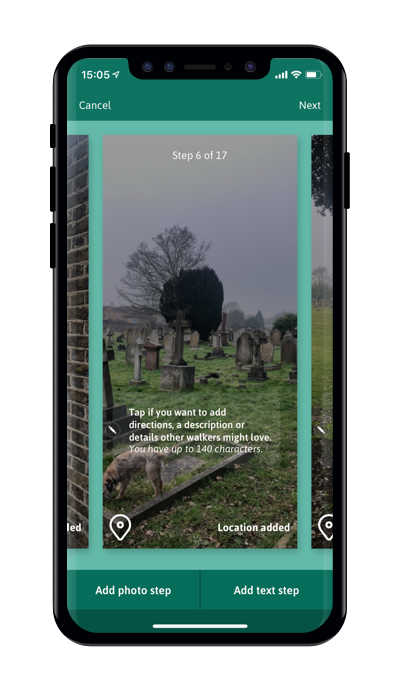
4. Add text to your steps
Add extra navigation information over your photos with a simple tap. If you run out of space for photos or need to add a step that doesn't have an image tap 'Add text step' which will bring up a green screen with more space. Do add a location pin to this step and do share information others may find useful such as where to find the loo.

6. Create a cover page
When you're done, head to the walking route cover page. Add an interesting or explanatory title to your walk. Add or edit the description and duration of the walk and add any features of the route that other people may find helpful. e.g. is it accessible or dog-friendly? Would the kids like it? Is there a cafe? That sort of thing.

7. Preview it then publish. Boom!
Once that's done and you're happy, it’s time to preview your walk (preview not yet available on Android). Check spelling, grammar and that the location pins are bang on and then once you're feeling it, publish your route for others to enjoy. On iOS or Android, you can always edit or delete it later by finding it in the Published walks tab of My Walks. Now why not share it with your friends via the Tree menu for others to enjoy?